When you enter the world of jewelry metalwork, you discover a new fascination with jewelry textures that you never knew existed. You knew before that metal could be cut, shaped, and bent in different ways to form rings, bracelets, and chokers, but adding dimpled or ridged textures to the surface simply makes the pieces so much more exciting!
In this blog post, we focus on jewelry textures, introducing you to the most common tools and hammers for creating all kinds of unique patterns in your metalwork.
What is Texturing?
As one of the elements of jewelry design, “texturing” refers to altering the surface shape of the metal by creating grooves (called “engraving”), hammering from the underside (called “repoussé”), and hammering from the topside (called “chasing”). These techniques have been used since ancient times and result in higher prices for pieces because they are so labor intensive. Depending on the tools and techniques you plan to use to texture your metal, you can either texture the metal flat sheet first and then dome it, or dome it first and then texture it. We will mention the tools that are suitable for texturing different shapes of metal while explaining each one.
Texturing Techniques and Tools
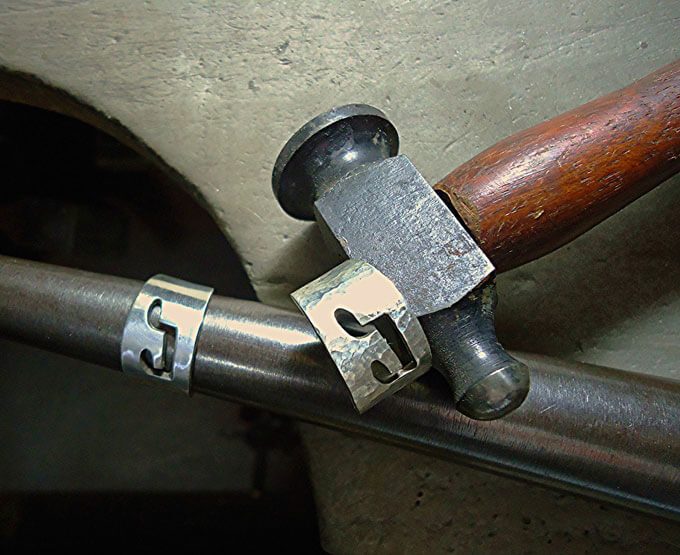
Stamps are one of the quickest and easiest ways to create a pattern in metal and can be used on flat and round surfaces. You can buy pre-made stamps individually or in a set, or design your own.
Another easy technique for texturing is rolling. To do this, the metal needs to be fully annealed, and must be flat. Choose a soft material to place between the metal sheet and the roller, and simply pass the layers through a rolling mill. Voilà! You now have textured metal ready to shape.
For more artisanal and unique texturing, you can use texturing hammers. There are hammers for working with flat, domed, and concave shapes, and you can create all sorts of patterns and effects by using one or a combination of hammers to gently alter and decorate the surface of your metal. Hammers are best held lightly, you’ll want to let the weight of the hammer do most of the work for you. Let’s have a look at the most common types of hammers for creating jewelry textures and how to use each one.
Planishing and embossing hammers
Planishing hammers have a flat face and a rounded face (if double-sided). Create even, overlapping jewelry textures on domed metal by supporting the metal on a mushroom stake and moving it around slowly as you strike. You can use the same technique with both the flat and rounded faces, however, the rounded face will leave deeper marks. It’s even possible to use both faces on the same piece. Start with the curved face and hammer lightly and consistently, following with the flat face to modify the effect.
This hammer is not suitable for concave shapes because the face won’t fit in the curve, but you can use it for flattening out wire and metal sheet, or shaping the metal to fit the shape of the stake underneath—again this requires the strikes to overlap.
Embossing hammers have oval or round faces and create dimpled jewelry textures—those with rounder faces producing a more pronounced effect. As with planishing hammers, embossing hammers can be used in forming the shape of the metal as well as for creating jewelry textures.
Raw silk, sandstone, and customized hammers
As with the last group, these hammers are used for making jewelry textures rather than forming. Raw silk hammers have a flat face and a domed face with etched or raised patterns that you can transfer to the metal by hammering straight down, or layer strikes from both faces for a unique effect.
Sandstone hammers also have a flat face and a domed face, both of which look like meat tenderizers and create a sandstone texture. Use the flat face on domed metal and the domed face on flat metal for best results.
You can even make your own customized hammer by taking an existing model and sawing your original design into the face with a flex shaft. When the design is complete, file, sand, and buff the face and it’s ready to use! Keep the depth as even as possible across the face so your pattern will be equally as deep and clear when you transfer it to the metal. Strike across the metal sheet you want to texture, taking care not to overlap the patterned “stamps” from your unique texturing hammer for a clear result.
Making Samples of your Textures
As you experiment with different jewelry textures, create a sample disc for each technique, hammer, and combination that you use. Buff the blank first for best results. On the back of the metal sheet, write or attach the name of the tools you used, and describe the technique that produced that particular effect. You can keep these as flat sheets, or make your samples from metal circles and dome them for display. To stop the samples from tarnishing, keep them in plastic gem boxes or something similar.
Straight cross-peen, riveting, and goldsmithing hammers
These hammers are used for texturing but not for forming the shape of the metal. The face of a cross-peen hammer is a straight line with varying degrees of sharpness (narrow, thin) or roundness (broad, thick). With cross-peen hammers, you can create jewelry textures made up of short lines that nearly look like engravings. Broader faces can be used in concave shapes for a subtle texture, and narrower faces make the lines much more pronounced. Overlap strikes with a cross-peen hammer to create a rippling, water-like effect.
Riveting and goldsmithing hammers are basically different combinations of planishing and cross-peen faces that allow you to create a larger variety of jewelry textures. Riveting hammers have a flat face and a cross-peen face, although you can modify the faces yourself to be more rounded (as opposed to flat or narrow). Goldsmithing hammers are like riveting hammers but larger, with a round, flat planishing face. To create straight and swirling jewelry textures with straight cross-peen, riveting, and goldsmithing hammers, use a marker to draw lines on the metal as a guide for your strikes as you work your way around.
Add a Distinctive Touch With Laser and Hand Engraving
To add a personalized and distinctive touch to your textured jewelry, have your pieces engraved with MKM’s laser and hand engraving services. We can also set gemstones, finish surfaces in a range of styles, and add enamel to your jewelry in stunning colors. If you have ideas for unique jewelry textures and want to make the most of our complete range of metals, tools, and technology, contact us about our streamlined manufacturing process. To find out more, call us today at (213) 689-4823 or send an email to info@mkmjewelry.com.
Leave a Comment